The Allure of Strawberry Themed Nails
Strawberry nail art captures hearts with its sweet, playful vibe. This design brings a touch of summer to your fingertips, no matter the season. The vibrant reds and lush greens of the strawberry theme make it a favorite among those seeking a cheerful and youthful look. There’s a freshness to this style that can brighten your day and wardrobe.
The draw of strawberry nail art lies in its versatility. It suits various occasions, from casual outings to festive gatherings. The iconic strawberry pattern pairs well with different outfits and accessories. Whether you opt for a full set of strawberry nails or a single accent nail, this design promises to turn heads.
The trend speaks to both nostalgia and trendiness. It evokes childhood memories of berry picking and sweet treats, while staying current with the latest fashion statements. This dual appeal ensures strawberry nail art remains a popular choice year after year. Red nails have long been a classic, but adding the playful strawberry twist brings an unexpected charm.
Moreover, strawberry themed nails allow for creativity. You can play with different shades of red and green and even introduce glitter or rhinestones for an extra sparkle. The theme also transcends age barriers; it’s loved by teenagers and adults alike who want to add a sprinkle of fun to their look. In the world of nail art, the strawberry design offers an irresistible combination of color, nostalgia, and fun.
Trending Strawberry Nail Art Designs
Enthusiasts of strawberry nail art are always looking for the freshest designs that echo style and fun.
Classic Strawberry Pattern
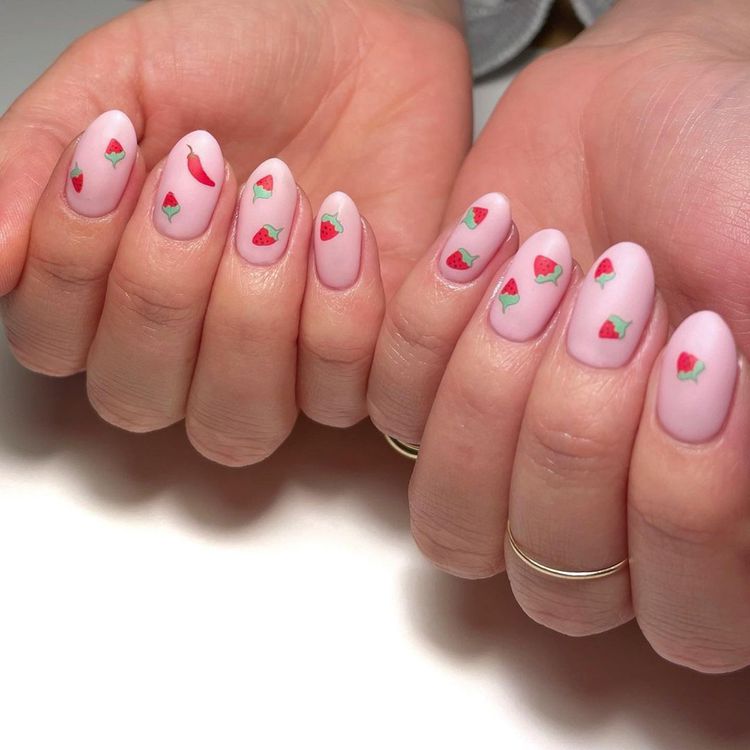
The classic strawberry pattern remains a beloved staple in the nail art community. It features tiny red strawberries with a pop of green leaves against a light base coat. To achieve this look, use a fine brush to dot on the red berries. Then, add small green leaves at the top of each berry. This design is simple yet striking, perfect for those who love timeless elegance.
Strawberry Fields Forever Accent
For a more subtle approach, the ‘Strawberry Fields Forever’ accent turns one nail into a focal point. Here, artists paint a single nail with a detailed strawberry scene. This may include a field of berries or even a single, large, and intricately designed strawberry. Pair this accent with a solid color on other nails to make it stand out.
3D Strawberry Design
Finally, for the ultimate strawberry nail art statement, the 3D strawberry design is taking center stage. This technique involves creating miniature strawberries that rise above the nail surface for a tactile effect. Use gel or acrylic to sculpt the berries, then paint them for realism. Top with a shiny coat to give your 3D strawberries a juicy appearance.

Step-by-Step Guide to Creating Strawberry Nail Art
To start with strawberry nail art, you need a clear, step-by-step guide. It’s crucial for achieving that fresh, vibrant look. Let’s walk through the process from gathering your tools to the finishing touches.
Choosing the Right Tools and Colors
The right tools and colors are key to perfecting strawberry nail art. You’ll need:
- Various brushes: A fine brush for details, a flat brush for the base coat.
- Nail polishes: Pick shades of red and green for the strawberries and leaves. Include a pale color for the base.
- A dotting tool or toothpick to create berry seeds.
- Acrylic or gel supplies if going for a 3D effect.
Remember, quality polishes ensure a smoother application and a better-looking finish.
Base Coat and Strawberry Base Design
Start with a clean, prepped nail. Apply a thin, even base coat. Choose a light base color to make your strawberries pop. Now, for the strawberry base: Use your red polish to create rounded berry shapes. Keep them small and evenly spaced for a classic pattern.
Adding Leaves and Details
Once the berries are dry, use a fine brush and green polish to add leaves on top. For a realistic touch, add tiny white dots to the strawberries as seeds. This is where precision counts – take your time with the tiny details.
Finishing Touches: Glossy or Matte?
The final step is choosing between a glossy or matte top coat. Glossy adds shine and makes your design stand out. Matte gives a trendy, modern finish. Apply your selected top coat carefully for a lasting impression. Whichever you choose, it will seal in your art and protect your strawberries from chips and wear.
Incorporating Strawberry Nail Art into Different Nail Shapes
Innovative adaptability is key when incorporating strawberry nail art across diverse nail shapes. Whether your nails are long and slender or short and sweet, there’s a strawberry design to suit.
Best Practices for Long Nails
Long nails offer an expansive canvas for intricate strawberry nail art. Here’s how to make the most of that space:
- Opt for larger, detailed strawberries to utilize the length.
- Consider adding extra elements like vines or multiple strawberries in a cluster.
- A gradient background can complement the length and add depth to your design.
- Utilize the space for 3D designs, which look particularly stunning on longer nails.
Ensure your designs don’t overwhelm the nail; balance is crucial, even with a larger area to work with.
Adapting Designs for Short Nails
Short nails can make just as bold a statement with strawberry nail art by following these tips:
- Stick to smaller berry designs to avoid a cluttered look.
- Choose fewer strawberries and pair them with simple patterns for contrast.
- Use a ‘Strawberry Fields Forever’ accent nail to focus the theme without overcrowding.
- A classic strawberry pattern works well, as the petite design complements shorter nails.
Short nails benefit from precise and clean art; don’t underestimate their power to showcase cute and playful strawberry nail art.

DIY Strawberry Nail Art Tips for Beginners
Breaking into the world of nail art can feel daunting, especially with intricate designs like strawberries. Yet, with the right instructions and a bit of practice, beginners can achieve delightful strawberry nail art. Below, you’ll find essential tips to help you start your journey toward nailing this sweet design.
Simplified Strawberry Patterns for Starters
To kick off your strawberry nail art adventure, consider starting with simplified patterns. Here’s how to create an easy yet charming strawberry look:
- Paint your nails with a pale pink or nude base.
- Use a dotting tool to add small red dots to mimic tiny strawberries.
- Draw little green tops on each red dot to represent the leaves.
- If confident, add tiny white specks for seeds.
These steps help you grasp the basics of strawberry nail art without overcomplication.
Mistake Fixes and Maintenance Advice
Mistakes are a part of the learning process. Here are quick fixes and maintenance tips:
- Made a smudge? Use a clean brush dipped in nail polish remover to correct errors.
- Keep a top coat handy to seal your design and prolong its life.
- If your berries don’t look perfect, remember practice makes perfect.
- Keep nails hydrated with cuticle oil to maintain a healthy base for art.
By mastering these beginner steps, you’re well on your way to creating playful and stylish strawberry nail art.
The Intersection of Fashion and Strawberry Nail Art
Strawberry nails art isn’t just a beauty trend; it’s a fashion statement. It blends nail creativity with personal style. Here’s how to coordinate strawberry nail art with your fashion choices to elevate your entire look.
Coordinating Your Look with Strawberry Nails
Creating a cohesive look with strawberry nail art takes a bit of planning. Consider these pointers:
- Match the reds of your nails with items in your outfit, like a scarf or shoes.
- Accessorize with jewelry featuring green gemstones to echo the leaves on your nails.
- For casual wear, rocket a denim look and let your strawberry nails add a pop of color.
- Don a floral dress with a strawberry clutch for a playful, thematic ensemble.
- Keep the rest of your outfit muted if your nails are loud; let them be the star.
Remember, style is about balance. Strawberry nail art should complement, not clash with, what you wear. Using these tips, you can create a harmonious and fashionable look that celebrates your love for this delightful art form.
:max_bytes(150000):strip_icc()/MinimalistStrawberryNails-614f145cbc854c8c8f570a2badbf9193.jpg)
Top Strawberry Nail Art Inspirations from Social Media
Social media is a goldmine for the newest and most creative strawberry nail art designs. Platforms like Instagram and Pinterest are bursting with inspiration. Here you’ll find everything from amateur DIYers to professional nail artists sharing their work.
Influencers to Follow for Fresh Ideas
On Instagram, top beauty influencers often showcase their latest nail art creations. For fresh strawberry nails art ideas, consider following these influencers:
- @PolishBerryNails: Known for vibrant nails art, their strawberry designs are particularly engaging.
- @BerryNailedIt: This account features a mix of fruity patterns, with an emphasis on strawberries.
- @NailFruitLoop: Their feed incorporates both simple and complex strawberry nail creations.
These influencers often share tips and tutorials, making it easier for you to recreate their designs.
Hashtags are the key to unlocking the vast world of nails art on social media. To stay up-to-date with the latest strawberry nail art trends, include these hashtags in your searches:
- #StrawberryNailArt: A direct line to all things strawberry nail related.
- #BerryNails: Broader searches that might reveal unexpected takes on the theme.
- #FruitNails: A wider lens for fruit-inspired nail art, including strawberries.
By combining the expertise of influencers with the extensive library of designs found under these hashtags, you’re bound to find your next nail art inspiration. Remember, the key is to let these ideas fuel your creativity, not simply to copy. With a little ingenuity, you can personalize these designs to suit your style.