Introduction: Halloween Nail Designs as a Statement
Halloween nail designs have transcended seasonal trends to become a bold form of self-expression. What began as simple orange-and-black polishes now includes intricate artistry that merges horror aesthetics with personal style. These nails are no longer just a Halloween accessory—they’re wearable art that declares your love for the spooky, the macabre, or the campy.
From DIY blood-splatter manis to salon-quality 3D pumpkin accents, modern halloween nail designs reflect creativity and cultural references. Fans of The Conjuring might sport ghostly white nails with red pupil dots, while indie horror enthusiasts opt for minimalist “witchy” greens and blacks. The trend’s rise parallels Halloween’s evolution into a month-long celebration of pop culture, where every detail—from costumes to nails—tells a story.
What makes these designs stand out is their duality: they’re both playful and provocative. A set of “mutilated” zombie nails, for instance, can spark conversations about horror tropes, while glittery witch-themed designs channel feminist iconography. Whether subtle or over-the-top, halloween nail designs prove that even small gestures can make a big statement this October.
Top 2025 Halloween Nail Trends
The future of halloween nail designs is set to blend cutting-edge tech with eco-conscious creativity. Here are the trends dominating 2025:
1. AR-Enhanced Nails
- Interactive Art: UV polish reacts to smartphone apps, animating designs like crawling spiders or glowing jack-o’-lanterns.
- Customizable: Users upload horror-themed images that “come to life” on their nails via AR filters.
2. Sustainable Horror
- Eco-Friendly Polishes: Brands now offer biodegradable glitter and toxin-free formulas.
- Reusable Designs: Magnetic nails with removable horror-themed decals reduce waste.
3. Nostalgic Horror Icons
- Retro Horror Revival: Replicas of Halloween’s Michael Myers mask or The Exorcist’s demonic eyes dominate.
- Vintage Palettes: Muted greens and browns pay homage to classic slasher films.
4. Kinetic Nail Art
- Moving Elements: Tiny magnets let nails “quiver” when touched, mimicking zombie limbs.
- Temperature-Sensitive Polish: Changes color from black to blood-red with body heat.
5. Minimalist Macabre
- Subtle Statements: Single black nails with gold coffin accents or matte “bloodstain” drips.
- Neutral Bases: Earth tones paired with faint ghost silhouettes for low-key horror.
These trends reflect a shift toward tech-driven creativity, sustainability, and nostalgia—all while keeping halloween nail designs as daring as ever.
DIY Halloween Nail Designs: A Step-by-Step Guide
Creating your own halloween nail designs is easier with this detailed guide! Follow these steps for flawless results:
Materials Needed
- Base Coat: Protects nails and improves polish adhesion.
- Nail Polish: Choose thematic colors (e.g., black, blood-red, orange, white).
- Tools:
- Fine-tip brush or toothpick for details.
- Dotting tool (e.g., a Sobo applicator) for precise dots.
- Clear tape for sharp lines (e.g., coffin shapes).
- Decorations:
- Fake blood stickers or decals.
- Glitter (holographic or chunky for texture).
- Top Coat: Seals the design and extends longevity.
1: Prep Your Nails
- Clean Nails: Wipe with acetone-free polish remover to remove oils.
- Shape and File: Use a file to smooth edges. Round or square shapes work best for detailed designs.
- Apply Base Coat: Use a thin, even layer. Wait 2–3 minutes to dry.
2: Choose a Base Color
- Classic Options:
- Black: Versatile for skulls, ghosts, or spiderwebs.
- Blood-Red: Perfect for wounds or vampire themes.
- Orange: Ideal for pumpkins or witches’ cauldrons.
- Application Tip: Use two thin coats instead of one thick one for even coverage.
3: Design Ideas & Execution
1: Blood-Splatter Nails
- Paint nails black.
- Dip a toothpick into red polish and flick it onto the black base.
- Add white dots (using a dotting tool) to mimic “splatter” texture.
2: Witch’s Coffin
- Paint nails black.
- Use white polish and tape to create a coffin shape at the tip.
- Add a tiny red heart sticker inside for a “grave” detail.
3: Pumpkin Manicure
- Paint nails orange.
- Use black polish to carve triangular “pumpkin” cuts.
- Add green stems using a fine-tip brush.
4: Add Embellishments
- Glitter: Apply a clear base coat, sprinkle glitter, then seal with another layer.
- Stickers: Press decals firmly to avoid bubbles. Use tweezers for precision.
5: Seal and Polish
- Apply a top coat. Use a UV lamp (if using gel polish) or let it air-dry for 5 minutes.
- Buff nails lightly with a soft cloth for a glossy finish.
Troubleshooting Tips
- Smudged Designs: Dip fingers in acetone, wipe gently, and redraw.
- Uneven Color: Add a third polish coat.
- Allergies: Opt for “hypoallergenic” polishes to avoid irritation.
Final Tips
- Speed Drying: Use a quick-dry top coat or hold nails over a heat lamp.
- Storage: Avoid touching water for 24 hours post-application.
With these detailed steps, your halloween nail designs will be the spookiest (and most enviable) at parties!
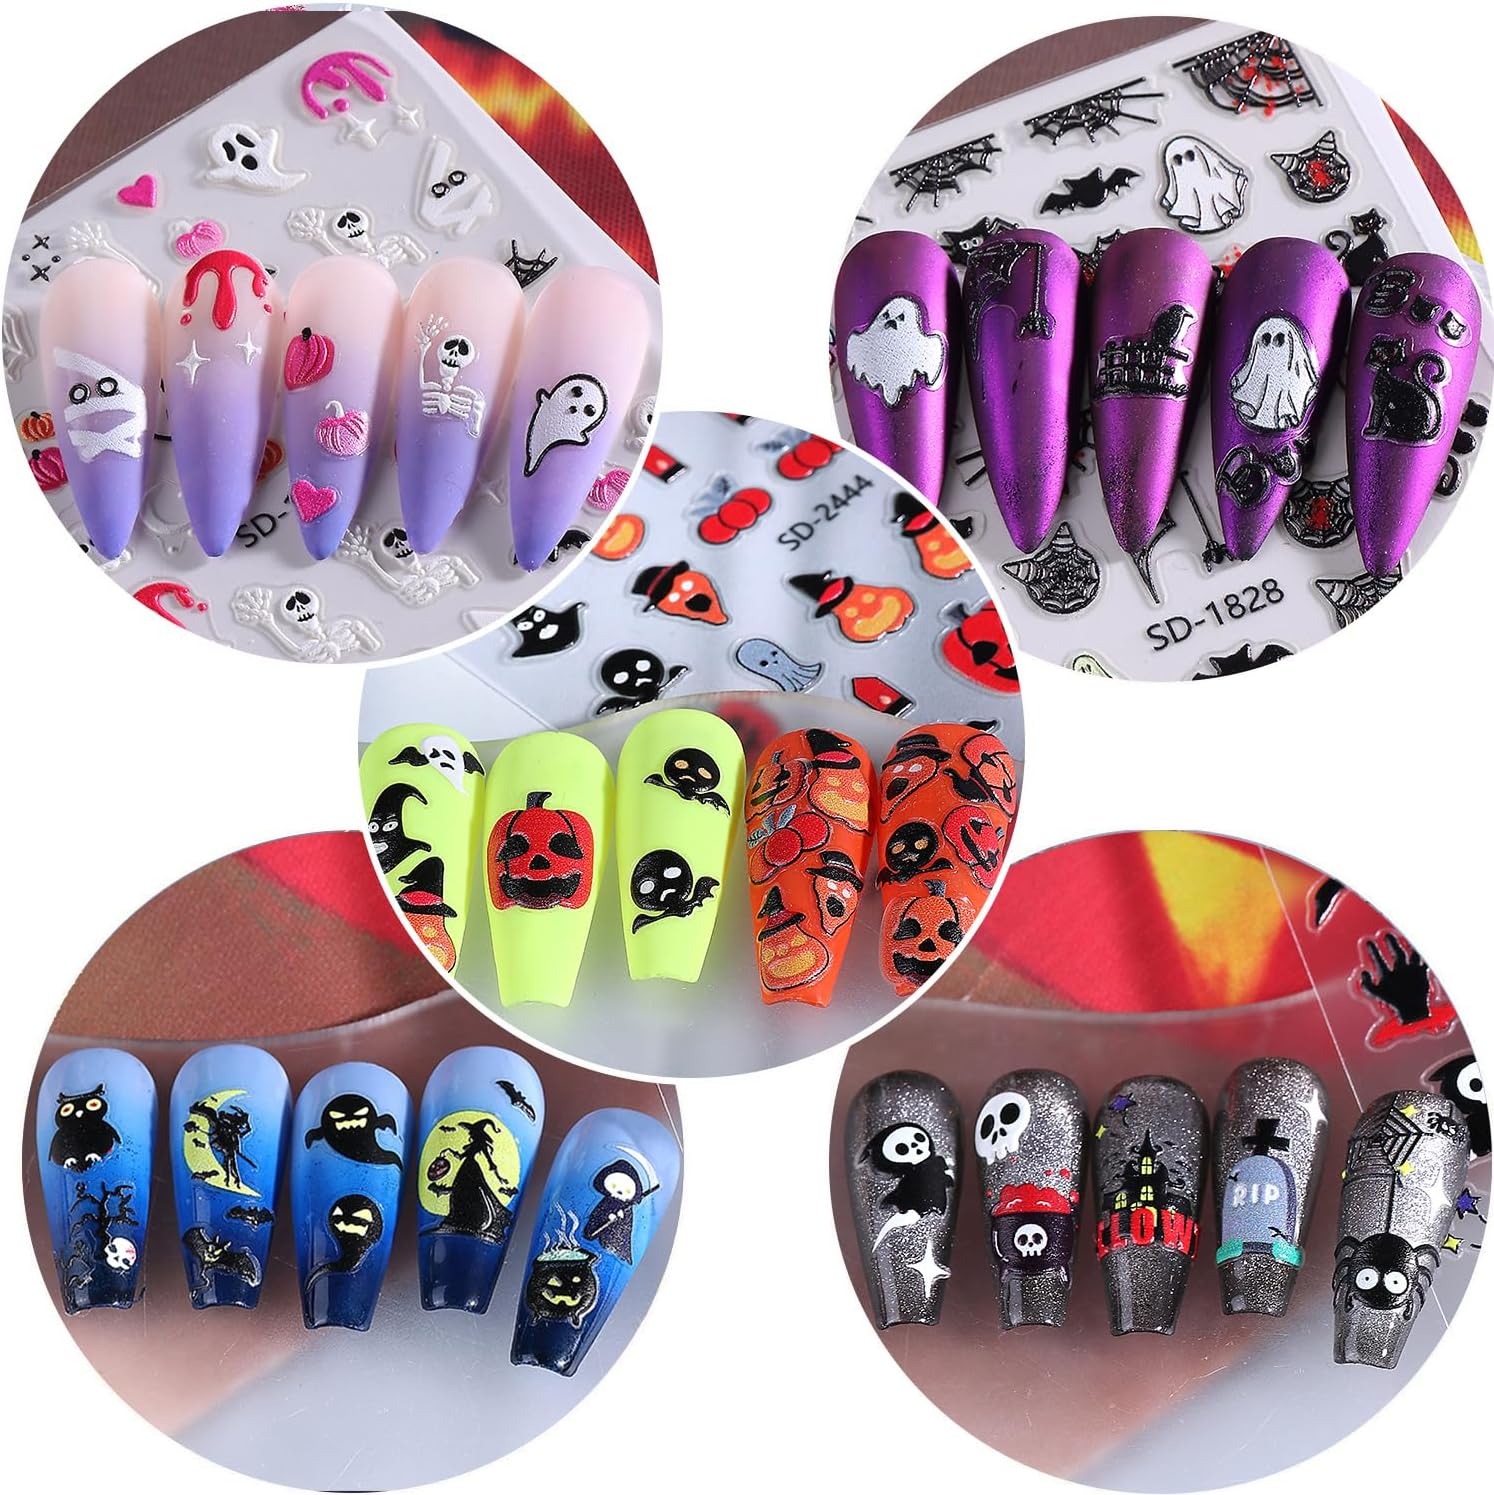
Iconic Horror-Inspired Designs
Halloween nail designs reach their peak when they channel iconic horror movies and characters. These timeless themes guarantee a spooky statement:
1. The Shining Maze
- Design: Black nails with a gold-painted labyrinth pattern.
- Symbolism: Represents the Overlook Hotel’s infamous hedge maze.
2. Freddy Krueg’s Glove
- Design: Green base with red “claw marks” using a toothpick.
- Details: Add tiny black dots to mimic blood droplets.
3. Pennywise the Clown
- Design: Red-and-white striped nails with a black “evil grin” at the tip.
- Bonus: Add a tiny plastic spider sticker.
4. Hereditary Candles
- Design: Black nails with silver wax drips and miniature candle stickers.
- Theme: Nods to Ari Aster’s minimalist horror aesthetic.
5. Ghostface Mask
- Design: White base with black “mask” lines and red “blood” streaks.
- Details: Add a tiny knife sticker for Scream fans.
These designs tap into collective horror nostalgia, making them perennial favorites. Pair them with themed costumes for a cohesive, eerie look.
Choosing the Right Supplies
Selecting the right tools and materials ensures your halloween nail designs stay vibrant and comfortable. Here’s how to pick wisely:
1. Nail Polish Types
- Gel Polish: Long-lasting (10–14 days) but requires UV lamps. Ideal for intricate details.
- Regular Polish: Affordable and easy to apply—great for beginners.
- Removable Gel: No UV lamp needed; peels off like regular polish.
2. Essential Tools
- Dotting Tools: Use toothpicks or specialized applicators for precise details (e.g., spider eyes).
- Stencils: Pre-cut templates simplify patterns like cobwebs or tombstones.
- Fine-Tip Brushes: Perfect for thin lines (e.g., vampire fangs).
3. Decorative Accents
- Decals: Pre-made designs (ghosts, pumpkins) save time.
- 3D Add-ons: Mini skulls or fake blood decals add texture.
- Glitter: Holographic or chunky glitter for “witchy” or “blood-splatter” effects.
4. Eco-Friendly Options
- Toxin-Free Polishes: Look for “5-Free” labels (no formaldehyde, toluene, etc.).
- Biodegradable Glitter: Reduces microplastic waste.
5. Budget-Friendly Hacks
- DIY Stencils: Use tape or printed patterns.
- Repurpose Supplies: Old nail art brushes work for small details.
Invest in quality polish and tools to avoid chipping or skin irritation. For elaborate halloween nail designs, splurge on specialty items like magnetic polish or UV glue for 3D accents.
Pairing Nails with Costumes
Your halloween nail designs should complement your costume to create a cohesive, memorable look. Here’s how to match them perfectly:
1. Witch Costume
- Nail Theme: Black-and-white “moon and stars” or blood-red tips with gold crescent moons.
- Details: Add fake blood decals or matte black polish for an eerie vibe.
2. Zombie Look
- Nail Theme: Peeling “rotten” skin effect using white and green polish.
- Details: Chipped polish and dirt streaks mimic decay.
3. Movie Character Costumes
- Freddy Krueger: Green nails with red claw marks.
- Pennywise: Red-and-white stripes with a black “smile” at the tip.
4. Minimalist Outfits
- Bold Nails: Use 3D skulls or glowing UV polish to steal attention.
5. Thematic Costumes
- Cemetery Scene: Black nails with silver “gravestone” decals.
- Haunted House: Gradient orange with black spiderweb details.
Avoid clashing colors—e.g., don’t pair a neon-green costume with bright pink nails. Let your halloween nail designs either mirror your costume’s theme or contrast it for dramatic effect.
Troubleshooting Common Issues
Even the best-laid halloween nail designs can go wrong. Here’s how to fix common problems:
1. Chipping or Peeling
- Cause: Skipping a base coat or uneven drying.
- Fix: Apply a new base coat, then reapply polish. Use a top coat every 2–3 days.
- Prevent: Avoid touching water for 24 hours after application.
2. Allergic Reactions
- Symptoms: Itching or redness from chemicals in polish.
- Fix: Immediately remove polish with acetone-free remover.
- Prevent: Choose “hypoallergenic” or “5-Free” polishes.
3. Smudged Details
- Cause: Rushing intricate designs.
- Fix: Dip fingers in acetone to erase mistakes, then redraw.
- Prevent: Work on one nail at a time and let each layer dry fully.
4. Uneven Color Coverage
- Cause: Thin brushstrokes or low-quality polish.
- Fix: Apply a second coat of polish.
- Prevent: Use high-quality brushes and shake bottles well before use.
5. Stuck Stickers or Decals
- Cause: Glue residue from poorly applied accents.
- Fix: Soak nails in acetone to gently remove residue.
- Prevent: Use nail-safe adhesive and avoid over-sticking.
6. All-Night Party Wear
- Pro Tip: Apply a waterproof top coat and avoid alcohol-based hand sanitizers.
With these fixes, your halloween nail designs will stay intact through trick-or-treating and costume parties.
FAQs About Halloween Nail Designs
Here are answers to common questions about halloween nail designs:
1. How long do DIY nails last?
- Answer: 3–5 days with proper care. Gel polish lasts 10–14 days. Reapply top coat every 2–3 days to extend longevity.
2. Can I wear them daily?
- Answer: Yes, but avoid heavy tasks like gardening or dishwashing. Use a protective top coat to reduce wear.
3. What tools do I need for DIY designs?
- Answer: Base coat, polish, dotting tool, and tape. Stencils and fine-tip brushes help with intricate details.
4. Are they safe for sensitive skin?
- Answer: Opt for “hypoallergenic” or “5-Free” polishes (no formaldehyde, toluene, or camphor). Test on a small area first.
5. How do I remove glitter or decals?
- Answer: Soak nails in acetone-based remover. Use a cotton pad and gentle scrub for stubborn glitter.
6. Can I wear them to formal events?
- Answer: Yes! Subtle designs like gold coffin accents or minimalist pumpkins work well. Avoid overly gory themes for professional settings.
7. My nails look streaky—what’s wrong?
- Answer: Use multiple thin coats instead of one thick layer. Shake polish well and ensure each layer dries fully.
8. Are reusable decal kits worth it?
- Answer: Yes! They’re budget-friendly and let you switch designs without repainting. Clean them with soap and store on their backing sheet.
9. Can I use gel polish at home?
- Answer: Yes—kits with UV lamps are widely available. Follow instructions carefully to avoid overexposure.
10. What’s the best polish for dark nails?
- Answer: Chalk polishes or white top coats create contrast on black/green bases.
Final Tip:
Consult a professional for complex designs like 3D elements. For DIYers, start with simple patterns (e.g., spiderwebs) before advancing to advanced techniques.